TL;DR
Adding a drip irrigation zone to an existing lawn system means installing a separate, low-pressure zone dedicated to slow, precise watering for garden beds, shrubs, or trees. The most important rule: drip and spray heads cannot share the same zone because they operate at completely different pressures and flow rates. You will need a new zone valve, pressure regulator, filter, and drip tubing, plus an available station on your irrigation controller. In windy, clay-soil regions like West Texas, drip zones can cut water use by 30 to 50 percent compared to traditional spray heads.
Every irrigation system is built around zones, and understanding what that word actually means is the first step toward adding drip to your setup. If you have flower beds getting blasted by lawn sprinklers, a vegetable garden you are hand-watering, or foundation plantings that need slow, deep soaking, a drip zone is the answer.
This glossary covers every term you will encounter when researching how to add a drip irrigation zone to an existing lawn system. The terms are grouped by category and build on each other, so reading in order gives you the clearest picture. But you can also jump to any section that matches the question you are trying to answer right now.
Before anything else, internalize the one rule that matters most: drip and spray cannot share a zone. This single principle drives every decision that follows.
If you are ready to see the full procedural walkthrough, our step-by-step zone addition guide covers the physical installation process in detail.
Why Drip and Spray Cannot Share a Zone
This deserves its own section because it is the most violated principle in residential irrigation. A Florida IFAS study of 3,416 homes found that 70% of residential irrigation systems water turf and landscape beds on the same zone. That is a problem.
Spray heads and rotors operate at 50 to 80 PSI and throw water in large volumes measured in gallons per minute. Drip emitters operate at 20 to 30 PSI and deliver water in gallons per hour, sometimes as slowly as half a gallon per hour. Running both on the same valve means the spray heads steal all the pressure and flow, leaving the drip emitters barely trickling.
Drip lines rely on back pressure (the pressure that builds up inside the tubing) to push water through tiny orifices in each emitter. When spray heads on the same zone dump water freely, that back pressure never develops. The University of Arizona Cooperative Extension puts it plainly: sprinkler and drip irrigation apply water at different rates and operate under different pressure, requiring separate valves. You need a pressure reducer and filter to protect drip emitters from high pressure and clogging.
This is the foundational concept behind adding a drip irrigation zone to an existing lawn system. Every component discussed below exists to create a separate, low-pressure environment alongside your higher-pressure spray zones.
System Architecture Terms
These are the building blocks of any irrigation system. Understanding them helps you see where a new drip zone fits into the plumbing you already have.
Irrigation Zone
A section of your system controlled by a single valve. Zones exist because your water supply has a limited flow rate. If you tried to run every sprinkler head at once, none of them would have enough pressure. Your controller opens one zone valve at a time (or a few, depending on your supply), runs it for a set duration, then closes it and opens the next. When you add a drip irrigation zone to an existing lawn system, you are adding one more zone to this sequence.
Drip Irrigation Zone
A zone dedicated entirely to low-pressure, low-volume water delivery through emitters rather than spray heads. It has its own valve, its own pressure regulator, its own filter, and its own run time on the controller. Because drip systems are 90 to 95 percent efficient (compared to 50 to 60 percent for spray heads), a drip zone delivers more water to plant roots with significantly less waste.
Mainline
The pressurized pipe that runs from your water source (after the backflow preventer) to the valve manifold. The mainline is always under pressure whenever your house water is on, regardless of whether a zone is running. When adding a new zone, you tap into this mainline with a T-fitting to supply water to the new drip valve.
Before tapping into your mainline, you should locate your existing sprinkler lines to avoid cutting into a lateral line by mistake.
Lateral Line
The pipe running from a zone valve out to the sprinkler heads or drip emitters. Unlike the mainline, a lateral line is only pressurized when its zone valve is open. In a drip zone, the lateral line is typically polyethylene tubing rather than PVC.
Valve Manifold
The location where multiple zone valves are grouped together, usually housed in a rectangular underground valve box. Most residential systems have one or two manifold locations. When you add a drip irrigation zone to an existing lawn system, you can often install the new valve in or near an existing manifold, which simplifies wiring and plumbing.
Zone Valve (Control Valve / Solenoid Valve)
An electrically controlled valve that opens and closes a single zone. The controller sends a 24-volt signal to the valve’s solenoid, which activates a plunger to allow water through. Each zone has one valve. If you are having trouble with an existing valve, our valve and solenoid troubleshooting guide can help you diagnose the issue before adding a new one.
Drip-Specific Components
These are the parts unique to drip irrigation. Skip any one of them and the zone will underperform or fail outright.
Pressure Regulator
A device that reduces incoming water pressure from your mainline (typically 50 to 80 PSI in municipal systems) down to the 20 to 30 PSI range that drip components require. Without a pressure regulator, high pressure will blow fittings apart, pop emitters out of tubing, and crack connections. For most residential drip zones, a 25 PSI regulator is the standard choice.
Practitioners on irrigation forums report that skipping the pressure regulator is one of the top two installation mistakes they see. Colorado State University Extension confirms this, listing the missing pressure reducer as a leading cause of drip system failure.
You can test your water pressure before you start to know exactly what your regulator needs to handle.
Inline Filter (Y-Filter)
A screen filter (typically 150 to 200 mesh) installed in the supply line to catch sediment, sand, and mineral particles before they reach the emitters. Drip emitter orifices are tiny. Even small particles will plug them. The University of Arizona Cooperative Extension states that a filter is required, not optional, for any drip system.
Placement order matters. In most systems, the recommended order from the valve outward is: valve, then pressure regulator, then filter, then drip tubing. However, some manufacturers (notably DripWorks) recommend the filter before the regulator. Always follow the instructions that come with your specific components.
Combo units like the DIG D54 combine a 150-mesh stainless steel filter with a 25 PSI pressure regulator in one assembly, reducing the number of fittings and potential leak points.
Drip Emitter
The device that actually delivers water to the soil. Each emitter releases water at a controlled rate, measured in gallons per hour (GPH). Common rates are 0.5, 1, and 2 GPH. For clay and caliche soils (common across West Texas), slower emitters in the 0.5 to 1 GPH range work best because they allow water to absorb without puddling on the surface.
Pressure-Compensating Emitter
A more advanced emitter that delivers a consistent flow rate regardless of pressure variations and elevation changes across the zone. If your drip zone covers uneven terrain, pressure-compensating emitters prevent the lowest point from flooding while the highest point stays dry. They cost slightly more but are worth it for any zone with more than a few feet of elevation change.
For yards with significant slope, irrigation design for sloped yards covers the broader planning considerations.
Inline Emitter Tubing (Dripline)
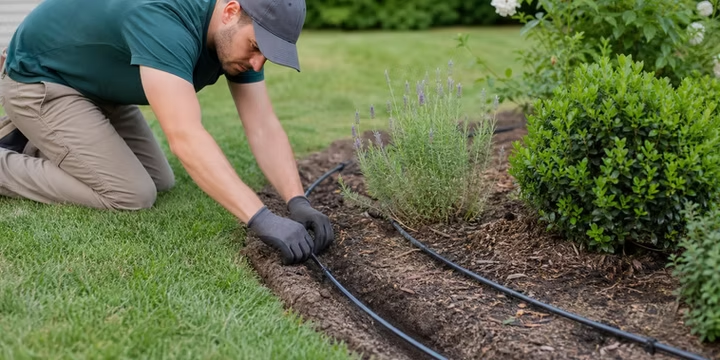
Polyethylene tubing with emitters pre-installed at regular intervals, commonly 12 or 18 inches apart. This is the workhorse product for drip zones covering garden beds, rows of shrubs, or ground cover areas. You lay it in rows across the bed and the emitters are already spaced for you. It is much faster to install than punching individual emitters into blank tubing.
Blank Tubing (Distribution Tubing)
Tubing without any emitters. Typically half-inch polyethylene. Used as the supply line running from the valve and filter assembly out to the planting area, where it connects to inline emitter tubing or individual emitters. Think of it as the lateral line for your drip zone.
Micro-Tubing (Quarter-Inch Tubing)
Small-diameter tubing that runs from the half-inch supply line to individual emitters at specific plants. Useful for container plants, widely spaced shrubs, or trees where you want to place emitters precisely at the root zone rather than running dripline across open ground.
Flush Valve / End Cap
A fitting installed at the end of each drip tubing run. End caps seal the tubing so water builds back pressure and feeds through the emitters. Some end caps are removable or have a flush valve built in, allowing you to periodically open them and flush sediment out of the line. Flushing once or twice a season keeps emitters from clogging.
Goof Plug
A small rubber plug used to seal unwanted holes in drip tubing. If you punch a hole in the wrong spot or remove an emitter you no longer need, a goof plug seals it. Keep a handful in your irrigation parts box because you will eventually need them.
Connection and Conversion Terms
This section covers how you physically connect a new drip zone to your existing system. There are two main approaches, and the right choice depends on your system layout and how much work you want to do.
Approach 1: Dedicated New Zone (Recommended)
The better approach for most projects. You install a brand-new zone valve connected to the mainline, wire it to a spare station on your controller, and run drip tubing from there. This gives the drip zone its own pressure regulator, filter, and independent schedule.
One homeowner on the OurFigs forum described the process: “We added a drip line off our lawn system for my garden. It needed a dedicated zone on the controller, and a drip-specific zone valve box. This allowed for a separate watering schedule and appropriate water pressure going to the drip lines.”
Approach 2: Spray-to-Drip Conversion Kit
A simpler option when you have an existing spray zone covering an area you want to convert entirely to drip. A conversion kit replaces the spray head nozzle on an existing riser with an adapter that connects to drip tubing.
The critical word here is “entirely.” If you convert one head on a zone to drip while leaving the others as spray, you have mixed drip and spray on the same zone, which violates the foundational rule. You must either convert every head on that zone or cap the unused risers.
Spray-to-Drip Conversion Kit
A packaged kit that screws onto an existing pop-up spray body (like a Rain Bird 1800 series) and converts the riser into a drip connection point. Rain Bird’s 1800RETRO and Toro’s Spray-to-Drip Retrofit Kit are common examples. The kit typically includes a built-in pressure regulator and filter, a distribution manifold, and quarter-inch micro-tubing connections.
Drip Retrofit Adapter
The core component inside a conversion kit. This adapter threads onto the riser where the spray nozzle used to sit and provides barbed or compression outlets for drip tubing.
T-Fitting (Tee)
A plumbing fitting shaped like the letter T, used to tap into an existing mainline to supply a new zone valve. You cut the mainline, glue in the tee (using PVC primer and cement for PVC pipe), and run a short pipe from the tee to the new valve. This is the most common connection method when adding a drip irrigation zone to an existing lawn system via the dedicated zone approach.
Barbed Fitting
A push-in fitting with ridged barbs that grip the inside of polyethylene tubing to create a secure connection. Barbed fittings are the standard connection method for drip tubing, elbows, tees, and end caps within the drip zone itself. No glue needed, just push and clamp.
Controller and Wiring Terms
This is where many DIY drip projects stall. Practitioners on Reddit and irrigation forums consistently identify controller capacity as the number-one gotcha that catches homeowners off guard.
Controller Station
A terminal on your irrigation controller that operates one zone valve. Each station has a wire connected to a specific valve’s solenoid. When you add a drip irrigation zone to an existing lawn system, you need one available station. If your controller has eight stations and you are currently using all eight, you have a problem.
Spare Wire
An unused conductor in the wire bundle that runs underground from the controller to the valve box area. When the system was originally installed, the installer may have pulled extra wires for future expansion. If a spare wire exists, connecting your new drip zone valve is straightforward. If it does not, you will need to pull new wire or use an Add-A-Zone device.
Add-A-Zone Device
An electronic module that lets two zone valves share a single wire pair. One unit installs at the controller and another at the valve box. It sends coded signals that distinguish between the two valves, eliminating the need to trench and pull new wire. This is a practical solution when your existing wire bundle has no spare conductors.
Zone Type Setting
A setting on many smart controllers (including the Hunter Hydrawise platform) that tells the controller what type of delivery device is on a zone. Options typically include spray, rotor, drip, and bubbler. Selecting “drip” adjusts the controller’s calculated run times and precipitation rate assumptions so that smart scheduling features work correctly. Without this setting, the controller treats your drip zone like a spray zone and dramatically underestimates the run time needed.
For a deeper walkthrough on station configuration, the guide to programming your Hunter controller covers zone type settings and scheduling in detail.
Performance and Planning Terms
These terms help you understand why a drip zone behaves so differently from spray zones and how to plan accordingly.
Precipitation Rate
How fast a system applies water to the soil, measured in inches per hour. Spray heads typically deliver 1.0 to 2.0 or more inches per hour. Drip systems deliver roughly 0.5 inches per hour or less. This is why drip zones run for much longer periods, and why mixing drip and spray on the same zone creates impossible scheduling conflicts. One system needs 12 minutes, the other needs 90.
Flow Rate (GPH / GPM)
The volume of water a component delivers or a supply can provide. Spray heads are measured in gallons per minute (GPM). Drip emitters are measured in gallons per hour (GPH). This difference is not just a labeling convention. It reflects the fundamentally different delivery philosophy: drip is slow and continuous, spray is fast and intermittent.
When designing a drip zone, add up the GPH of every emitter on the zone and convert to GPM (divide by 60) to confirm your water supply can handle it alongside other zones.
Back Pressure
The pressure that builds up inside a closed drip system as water fills the tubing but can only escape slowly through emitter orifices. Back pressure is what makes drip work. Without it (as when spray heads on the same zone release water freely), emitters cannot push water through their tiny openings. This is the physics behind the “no mixing” rule.
Cycle and Soak
A programming method that breaks a long watering cycle into short intervals with pauses in between. For example, instead of running a drip zone for 90 continuous minutes, you program three 30-minute cycles with 30-minute soak pauses between them. This is especially important for clay soil, which absorbs water slowly. Without cycle and soak, water pools on the surface and runs off instead of penetrating the root zone.
Hydrozoning
Grouping plants with similar water needs on the same irrigation zone. Turf grass, perennial beds, native shrubs, and vegetable gardens all have different water requirements. When you add a drip irrigation zone to an existing lawn system, you are practicing hydrozoning by giving your landscape beds a delivery method and schedule matched to their actual needs, separate from the lawn.
Drip Depot’s design guidance reinforces this: “When zoning a drip system, you are effectively separating plants that have different watering needs from others. You can also separate your zones by type of soil and size of plants.”
Scheduling: Why Drip Zones Run So Much Longer
New drip zone owners are often shocked by the run times. Where a spray zone might run 10 to 15 minutes, a drip zone typically runs 45 to 90 minutes, two to three times per week. Texas A&M Extension goes further, recommending a minimum of three hours for established shrub beds and up to six to twelve hours for large shrubs or small trees during deep-soak cycles.
A drip irrigation expert quoted by several practitioners warns against applying “sprinkler mentality” to drip scheduling: thinking in 15-minute increments and then wondering why plants look stressed. The slow application rate is the whole point. It gives water time to percolate deeply into the root zone rather than sheeting off the surface.
This scheduling difference is also why the zone type setting on your controller matters so much. If the controller thinks it is running a spray zone, any smart-scheduling features will calculate absurdly short run times for your drip zone.
Water Savings and Efficiency
The efficiency gains from drip are well documented. Drip irrigation is generally considered 90 to 95 percent efficient, meaning almost all the water applied reaches the root zone. Spray heads and rotors land in the 50 to 60 percent range under ideal conditions, and much lower in wind.
Water conservation studies consistently show drip systems reduce water use by 30 to 50 percent compared to traditional spray irrigation. Some manufacturer claims go as high as 70 percent reduction, though real-world results depend on soil type, plant selection, and how well the system is maintained.
Texas A&M Extension describes drip as “perhaps the most efficient way to water the home landscape,” noting that water flows under low pressure through emitters laid alongside plants, minimizing evaporation and runoff.
For a full comparison of costs and long-term savings, our drip vs. sprinklers efficiency guide breaks down the numbers.
West Texas Considerations: Why Drip Matters Even More Here
Most guides about how to add a drip irrigation zone to an existing lawn system are written for generic climates. West Texas is not generic. Three factors make drip zones especially valuable in the Lubbock area.
Wind
Lubbock’s sustained June winds of 15 to 25 mph are normal, not exceptional. Sprinkler wind drift losses range from near zero on calm days up to 40 to 50 percent under windy conditions. That means on a typical summer afternoon, nearly half the water from your spray heads never reaches the ground where you intended it. Drip emitters sit at ground level or just below mulch, making wind losses essentially zero.
Clay and Caliche Soil
The heavy clay soils across Lubbock absorb water slowly. Spray heads that dump 1.5 inches per hour overwhelm the soil’s infiltration rate, creating runoff and puddles. Drip’s slow application (0.5 to 1 GPH per emitter) matches the pace at which clay actually absorbs water. Cycle and soak programming amplifies this advantage by giving the soil rest periods between watering intervals.
Watering Restrictions
Many West Texas municipalities allow exemptions or extended watering windows for drip irrigation, since drip produces no overspray, no runoff into streets, and minimal evaporation. Check your local utility for specific rules, but in general, adding a drip zone gives you more scheduling flexibility during restricted watering periods.
For more strategies on reducing your Lubbock water bill, including drip zone optimization, that guide walks through the math.
Common Mistakes When Adding a Drip Zone
Colorado State University Extension identifies the most frequent drip installation errors as: not installing a filter or pressure reducer, using overly long lengths of mainline tubing, and adding too many emitters to a single run.
Here are the mistakes that trip up homeowners most often:
Mixing drip and spray on the same zone. Already covered above, but worth repeating because 70 percent of residential systems get this wrong.
Forgetting the filter. Municipal water is cleaner than well water, but it still carries enough sediment to clog emitters over a season or two. Always install a filter.
Skipping the pressure regulator. Without one, your 60 PSI mainline pressure will blow fittings apart and damage emitters.
Not checking controller capacity. If your controller has no available stations, you cannot run a new zone. Check before you buy parts, not after you have dug the trench.
Under-emitting. Drip Depot’s design team notes that the most common design mistake is not including enough emitters. Each plant needs adequate root zone coverage, not just a single emitter placed nearby.
Using sprinkler run times. Running drip for 15 minutes accomplishes almost nothing. Set appropriate run times of 45 minutes or more, depending on soil type and plant needs.
Cost Range for Adding a Drip Zone
Adding a drip irrigation zone to an existing lawn system typically costs between $300 and $1,500 per zone. The wide range depends on several factors:
- How far the new zone is from the existing valve manifold and mainline
- Whether you need to upgrade the controller or add stations
- The size of the area being served (more emitter tubing and fittings)
- Whether you hire a professional or do it yourself
The lower end of that range covers a simple conversion kit applied to an existing zone. The higher end covers a fully new zone with dedicated valve, trenching, new wire, and professional installation.
If your system needs broader updates, our maintenance plan comparison explains how ongoing professional maintenance keeps both new and existing zones performing efficiently over time.
Frequently Asked Questions
Can I just add drip emitters to my existing spray zone?
No. Spray heads operate at 50 to 80 PSI and drip emitters need 20 to 30 PSI. Running both on the same valve means the spray heads consume all the available flow and pressure, leaving the drip emitters starved. You need a dedicated zone with its own valve and pressure regulator, or you must convert the entire spray zone to drip using a conversion kit.
Do I need a new controller to add a drip zone?
Only if your current controller has no available stations. Count your existing zones and compare to the number of stations on your controller. Many controllers are modular and can accept expansion modules. If you are out of stations and cannot expand, you will need to upgrade the controller or use an Add-A-Zone device to share a wire pair between two valves.
How long should I run a drip zone?
Much longer than you think. Drip zones typically run 45 to 90 minutes per session, two to three times per week. For established shrubs and trees, Texas A&M Extension recommends a minimum of three hours. In clay soil, use cycle and soak programming to break that into shorter intervals with rest periods.
What is the difference between a conversion kit and adding a new zone?
A conversion kit replaces spray heads on an existing zone with drip adapters. It is simpler but means you lose the spray coverage on that zone entirely. Adding a new zone means installing a new valve on the mainline, wiring it to the controller, and running drip tubing from there. A new zone gives you independent scheduling and keeps your existing spray zones intact.
How much water will a drip zone save?
Studies consistently show 30 to 50 percent reductions in water use compared to spray irrigation for the same planting area. In windy areas like Lubbock, where spray heads can lose 40 to 50 percent of their output to wind drift, the savings can be even greater.
Can I install a drip zone myself?
Many homeowners do. The plumbing is simpler than spray zone installation because drip tubing uses push-on barbed fittings rather than glued PVC. The trickiest parts are tapping into the mainline (which does require PVC work) and wiring the new valve to the controller. If either of those steps is outside your comfort zone, a professional can handle the valve and wiring while you run the drip tubing yourself.
What maintenance does a drip zone need?
Flush the lines by opening the end caps once or twice per season to clear sediment. Clean or replace the filter screen at least once a year. Inspect emitters periodically for clogs or damage, especially at the start of each watering season. Check for leaks where tubing connects to fittings.
When should I call a professional instead of doing it myself?
Call a pro if you have no spare stations on your controller and are unsure about expansion options, if you cannot locate your mainline, if your system has low pressure issues that need diagnosis first, or if the drip zone needs to cover a large or complex planting area. A professional assessment ensures the new zone integrates cleanly with your existing system without creating pressure or flow problems on other zones.
Ready to add a drip zone to your Lubbock area irrigation system? M&M Sprinklers’ irrigation team has been designing and installing zone additions across West Texas since 1987. Reach out at (806) 794-1300 for a professional assessment of your system.