
TL;DR
A leaking irrigation backflow assembly is either normal (brief dripping during pressure changes) or a sign of internal failure that needs attention. The four main device types, AVB, PVB, DCVA, and RPZ, each leak differently and require different fixes. Most residential leaks trace back to worn seals, debris fouling, or freeze damage. Repairs range from $100 to $500, while full replacements run $280 to $1,550 depending on the assembly type.
If you’re standing next to a dripping backflow device right now, this glossary will help you identify what you have, figure out what’s wrong, and decide whether you need a repair kit or a licensed professional.
Your backflow preventer sits between your irrigation system and your home’s drinking water supply. Its only job is to stop contaminated water from flowing backward into the potable water system. When it leaks, that’s either the device doing its job (briefly) or a sign that something internal has failed. Knowing the difference saves you money and protects your water supply.
Already know your device is leaking and want professional help? Check out our backflow preventer repair costs for Lubbock-area pricing.
This glossary covers every term, part, and symptom you’ll encounter when learning how to detect and repair a leaking irrigation backflow assembly. It’s organized to follow the natural workflow: identify your device, distinguish normal behavior from real problems, pinpoint the cause, understand the parts involved, and make a smart repair-or-replace decision.
Backflow Assembly Types: Identify What You Have
Before you can diagnose a leak, you need to know which type of backflow preventer is installed on your system. Each type has a different design, different leak patterns, and different repair requirements. Most homeowners have never looked closely at their device, so here’s how to tell them apart.
Atmospheric Vacuum Breaker (AVB)
The simplest backflow device. An AVB is a small, bell-shaped fitting installed directly on each zone valve. It has no test cocks and cannot handle continuous pressure. You’ll find these on older or very basic systems, usually mounted on the valve itself rather than as a standalone assembly near the water meter.
Leak pattern: AVBs drip from the air vent during normal operation (when that zone is running). Dripping after the zone shuts off means the internal float or seat is worn.
Pressure Vacuum Breaker (PVB)
The most common residential irrigation backflow device. A PVB is a tall, vertical assembly that must be installed at least 12 inches above the highest sprinkler head in the system. You’ll see it standing upright near the house or meter, usually with a bell-shaped bonnet on top and two test cocks (small brass fittings with quarter-turn handles) on the body.
Leak pattern: Water weeping from the bonnet vent on top. This is the most frequently repaired backflow device in residential irrigation, and the bonnet/poppet assembly is almost always the culprit. A PVB protects against backsiphonage only, not backpressure, which is sufficient for most residential sprinkler systems.
Double Check Valve Assembly (DCVA)
A more compact, horizontal or inline device with two independently operating check valves inside. DCVAs can be installed below ground (in a valve box) and are used for low-to-moderate hazard applications. They have four test cocks and two shutoff valves.
Leak pattern: Since DCVAs are often buried, leaks may not be visible at the surface. Watch for unexplained soggy spots near the valve box or rising water bills. When a DCVA fails, it typically leaks through internally rather than to atmosphere, which makes it harder to detect without a gauge test.
Reduced Pressure Zone Assembly (RPZ)
The highest level of backflow protection. An RPZ is a horizontal assembly with two check valves and a relief valve monitoring the pressure zone between them. It has a visible relief port on the bottom that intentionally dumps water when something goes wrong internally.
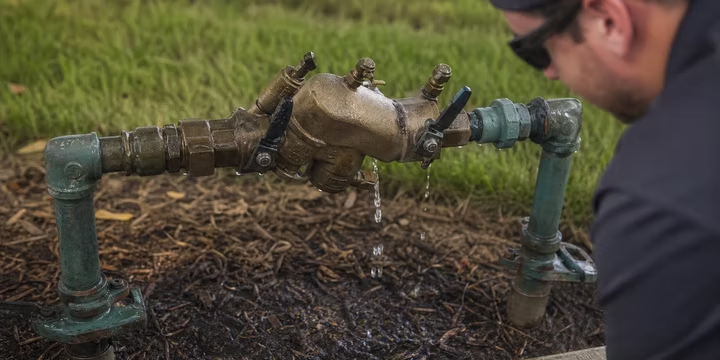
Leak pattern: Water pouring from the relief valve port underneath the assembly. This is the RPZ doing exactly what it was designed to do. It dumps water to atmosphere rather than allow any possibility of contamination passing through. Continuous dumping, though, means a check valve has failed or debris is holding a valve open.
Caleffi, a major manufacturer, explains the mechanism in their technical Q&A: pressure fluctuations on the incoming supply can briefly unseat the check valves, allowing debris to wedge into the narrow sealing surface. Once grit is trapped there, the valve can’t close fully, and the relief valve opens. This “debris wedge” insight is something most repair guides overlook, but it explains why an RPZ that was fine yesterday is suddenly dumping water today.
Normal Dripping vs. A Real Leak
This is the single most common question homeowners have. Understanding how to detect a leaking irrigation backflow assembly starts with knowing what’s actually normal.
Normal Relief Discharge
A brief spit of water during system startup, shutdown, or pressure stabilization. This happens because the relief valve (on RPZ devices) or the air vent (on PVB/AVB devices) responds to momentary pressure changes. It should stop within a few seconds.
Nuisance Drip
Intermittent dripping that comes and goes, often correlating with municipal pressure fluctuations (early morning, peak usage hours). This is an early warning sign. The seals are starting to wear but haven’t fully failed yet. Worth monitoring, not yet an emergency.
Continuous Leak
Persistent water flow when the irrigation system is off. This always indicates a problem. Whether it’s a trickle from the bonnet or a steady stream from the relief valve, continuous leaking means something internal has failed and needs repair.
Quick decision tree: When does it drip? If only during an irrigation cycle, it’s likely normal (especially for AVBs and PVBs). If it continues more than five minutes after the system shuts off, investigate. If it’s constant regardless of whether the system is running, call a professional.
For a deeper look at diagnostic signals, see our guide on signs your backflow needs repair.
Detection Signs and What They Mean
Knowing how to detect and repair a leaking irrigation backflow assembly means reading the right clues. Here are the specific signs, what each one points to, and how urgent it is.
Visible Water Pooling
Puddles forming around the base of the device or at pipe connections. Check body seams, union fittings, and the joints where the assembly connects to the supply line. Pooling from connections usually means a loose fitting or degraded thread tape, not an internal failure. Pooling from the body itself could indicate a crack.
Relief Valve Discharge (RPZ Only)
Water flowing from the relief port underneath the assembly. A small amount during pressure changes is normal. Continuous flow means the first check valve is not sealing, usually from a dirty or damaged disc. This is the most common RPZ failure mode.
Bonnet Vent Leak (PVB Only)
Water dripping or streaming from the top of the PVB where the bonnet sits. This almost always means the poppet (the spring-loaded float inside the bonnet) is damaged, or the O-ring between the bonnet and body has failed. In many cases, especially after a freeze, the bonnet itself is cracked.
Test Cock Drip
Water seeping from the small brass test cock fittings on the side of the assembly. Usually caused by loose caps or deteriorated rubber seals inside the test cock. An easy fix: tighten the caps or replace the small internal gaskets.
Pressure Fluctuation
Erratic sprinkler pressure across zones can indicate that the backflow device is partially obstructed or a check valve is not opening fully. If you notice low water pressure that wasn’t there before, the backflow assembly is a reasonable suspect.
Hissing or Whistling
Air rushing through a gap where it shouldn’t be. This typically means a cracked seat, debris preventing full closure, or a spring that’s lost tension. The sound is most noticeable during zone transitions when pressure shifts rapidly.
Unexplained Water Bill Increase
A silent, constant leak through the relief valve or a hairline crack in the body can waste hundreds of gallons without obvious pooling, especially if the water drains into gravel or soil. If your bill climbs with no change in irrigation schedule, inspect the backflow assembly along with the rest of the system.
Backflow maintenance experts recommend snapping a photo of your device and the leak location (vent, test cock, body seam, union, or ball valve) before calling for service. This saves time during diagnosis and helps the technician bring the right parts.
Common Causes of Irrigation Backflow Assembly Leaks
Once you’ve identified where the leak is coming from, the next step in learning how to detect and repair a leaking irrigation backflow assembly is understanding why it’s happening.
Debris Fouling
Sand, grit, sediment, or mineral deposits lodge in the check valve sealing surface and prevent the disc from making a clean seal against the seat. This is the single most common cause of backflow test failures and relief valve discharge. West Texas water, with its mineral content, accelerates this process. Flushing the supply line before the season starts reduces the risk.
Worn Seals and O-Rings
Rubber components degrade over time from UV exposure, temperature cycling, and water chemistry. O-rings harden and lose their elasticity. Discs develop grooves or flat spots where they contact the seat. These are consumable parts, designed to be replaced periodically, and they’re usually the first thing to fail.
Freeze Damage
This deserves special attention for West Texas homeowners. Water expands roughly 9% when it freezes. If the backflow preventer isn’t properly winterized, trapped water can crack internal components or the housing itself.
Here’s the part most people don’t know: the bonnet and poppet assembly on a PVB is intentionally designed as a sacrificial component. It’s engineered to break first during a freeze event, absorbing the pressure so the brass body survives. This is a feature, not a defect. A $20 to $60 bonnet/poppet repair kit fixes freeze damage in most cases, as long as the main body didn’t crack.
One Walmart reviewer of a Febco 765 repair kit described it as the “simplest fix for anyone” and advised against paying a plumber for a basic PVB bonnet repair after freeze damage. That’s fair for a straightforward bonnet swap, though it’s important to know when the job goes beyond DIY territory (more on that below).
To prevent freeze damage in the first place, our guide on winterizing your backflow preventer covers the steps specific to Texas systems.
Excessive Water Pressure
Sudden pressure spikes stress internal components and can unseat check valves. Over time, repeated spikes cause fatigue fractures in springs and deform rubber parts. If your home doesn’t have a pressure regulator, or if municipal pressure regularly exceeds 80 PSI, backflow assemblies wear faster.
Age Degradation
Brass corrodes slowly. Rubber hardens. Springs lose tension. Assemblies over 10 to 15 years old are at higher risk for multiple simultaneous failures. At that age, replacing one part often reveals that the next component is about to go.
Improper Installation
A PVB installed below the highest sprinkler head, a missing air gap, or a downstream shutoff valve placed in the wrong position can all create conditions that cause leaking. Installation errors don’t always show up immediately. Sometimes the device works for years before a specific pressure condition triggers the failure.
Backsiphonage vs. Backpressure
Two different mechanisms that can stress a backflow device. Backsiphonage happens when supply pressure drops (a water main break, for example), creating suction that pulls water backward. Backpressure occurs when downstream pressure exceeds supply pressure (a pump feeding into the system, or thermal expansion in a closed loop). PVBs only protect against backsiphonage. RPZs and DCVAs handle both. Using the wrong device for the hazard type is itself a cause of failure.
Internal Parts You’ll Hear About During Repairs
When a technician explains what’s wrong with your assembly, or when you’re reading a repair kit description, these are the terms that come up. Understanding them makes the difference between a confident repair decision and an expensive guess.
Bonnet
The top cap or housing on a PVB that contains the poppet mechanism. Usually made of plastic or brass. On freeze-damaged PVBs, this is often the first visible point of failure, sometimes cracked right down the middle.
Poppet (Float)
A spring-loaded plastic component inside the bonnet that seals against atmosphere when the system is pressurized. When pressure drops, the poppet is supposed to open and let air in, breaking the siphon. A damaged poppet either won’t seal (constant drip) or won’t open (no backflow protection).
Check Valve (First and Second)
Internal spring-loaded valves that prevent reverse flow. Most assemblies have two, and the first check (closest to the supply) fails more often because it bears the brunt of pressure changes and debris. Practitioners on Reddit’s r/Irrigation forum note that a leaking backflow preventer almost always traces back to a faulty first check valve.
Disc and Seat
The rubber disc seals against the metal seat inside each check valve. This is where the actual sealing happens. A disc with a nick, groove, or embedded piece of grit can’t seal properly. Seats can also develop pitting over time. Some seats are replaceable; others are machined into the body and require specialized tools. Irrigation professionals advise using dedicated backflow seat tools from specialty suppliers rather than improvising with standard plumbing tools.
Relief Valve
The safety valve found on RPZ assemblies. It monitors the pressure in the zone between the two check valves. If that zone pressure isn’t maintained correctly (because a check valve is leaking), the relief valve opens and dumps water. It’s the last line of defense before contamination could reach your drinking water.
O-Ring
Rubber seals at connection points, test cocks, and bonnets. Inexpensive (pennies each) but critical. A single flattened or cracked O-ring can be the sole cause of an otherwise mysterious drip.
Spring
Provides closing force on check valves and poppets. Springs weaken with age and corrosion. A weak spring means the check valve needs less debris or less pressure fluctuation to fail.
Test Cocks
Small ports on the assembly body used by certified testers to measure differential pressure. They have quarter-turn ball valves and rubber gaskets. Homeowners sometimes mistake a leaking test cock for a major internal failure when it’s just a loose cap.
Repair Kit
A manufacturer-specific bundle of the consumable parts inside a backflow assembly. For a common residential PVB like the Febco 765, a repair kit typically includes the bonnet, O-ring, spring, E-ring, washer, stem, rubber disc, and poppet. Retail price ranges from $15 to $60 depending on the brand and where you buy it. For reference, how backflow repairs are diagnosed walks through the professional process step by step.
Repair vs. Replace: The Decision Framework
Understanding how to detect and repair a leaking irrigation backflow assembly includes knowing when repair doesn’t make sense anymore.
The 50% Rule
If the cost of repair approaches 50% of the price of a new assembly (installed), replacement is usually the smarter investment. You get new components throughout, a fresh warranty, and reset the clock on age-related failures.
Cost Benchmarks
Residential backflow repairs typically cost $100 to $500. Commercial repairs run $200 to $700. On the replacement side, expect $280 to $1,550 depending on device type, with PVB units on the lower end and RPZ assemblies at the top. Sometimes a $20 rubber kit is all that’s needed. Other times, multiple internal components have failed simultaneously, and the repair bill climbs past the point where replacement makes more financial sense.
For Lubbock-area pricing, our repair cost guide breaks down the numbers by device type and common repair scenarios.
Parts Availability
Assemblies over 10 years old may have discontinued parts. If the manufacturer no longer makes the repair kit for your model, replacement becomes the only option. Before committing to a repair, verify that parts are still in production.
Re-Certification Requirement
Most jurisdictions (including Lubbock) require a licensed test after any internal repair to a backflow assembly. This means even a successful DIY repair needs professional validation before it’s considered compliant. Factor the cost of re-testing ($50 to $150) into your repair-vs-replace math.
Consecutive Test Failures
If your assembly has failed its certification test two or more times in a row despite repairs, the body itself may be compromised. Pitting in the seats, corrosion in the bore, or warping from repeated freeze cycles can make an assembly fundamentally unrepairable.
When You Must Call a Licensed Professional
Some backflow work is firmly in DIY territory. A PVB bonnet/poppet swap after a freeze is straightforward, and plenty of homeowners handle it successfully. But other situations require licensed hands, both for safety and for legal compliance.
BPAT (Backflow Prevention Assembly Tester)
In Texas, the TCEQ (Texas Commission on Environmental Quality) issues BPAT licenses. Only a BPAT-licensed tester can officially test and certify a backflow assembly. This isn’t optional. Testing without proper licensure means the results won’t be accepted by the city.
Re-Test After Repair
Many jurisdictions mandate testing after any repair that opens the assembly. In Lubbock, all tests must be performed by a TCEQ-licensed BPAT who is registered with the city. Even a well-executed DIY rebuild might not pass inspection if procedural steps were missed. To learn what the testing process looks like, see how long backflow testing takes.
Cross-Connection Control Program
Lubbock administers a cross-connection control program that tracks backflow compliance for every connected property. Residential irrigation systems connected to the city water supply require backflow testing every one to three years. Commercial systems require annual testing. All testing is at the property owner’s expense, and test reports must be submitted within 10 days.
When DIY Reaches Its Limit
For RPZ and DCVA assemblies, practitioners on Reddit’s r/Irrigation consistently recommend professional service. These devices require specialized gauge testing, dedicated seat tools, and re-certification after repair. The consensus is clear: DIY is viable mainly for PVB bonnet/poppet swaps, not for multi-check assemblies where improper reassembly could compromise drinking water safety.
On JustAnswer, a homeowner opened their device and found a broken plastic leg and a loose O-ring they couldn’t identify or properly seat. This is the typical failure point for DIY repairs on complex assemblies. If you open the device and find parts you can’t name, it’s time to call someone.
You can prepare for your backflow test to make the process faster and less expensive.
Prevention and Maintenance Tips
The best approach to a leaking irrigation backflow assembly is preventing the leak in the first place.
Winterize before freezes. Drain the assembly completely before the first hard freeze. In West Texas, that window can sneak up fast. Insulated covers add a layer of protection but are not a substitute for draining. Our freeze protection guide covers the full process for the entire system.
Visual inspection between required tests. Walk out to your assembly once a season. Look for mineral buildup, corrosion, cracked fittings, or signs of animal or lawn-equipment damage. Catching a small problem early prevents a big repair later.
Flush the supply line. Open the downstream shutoff briefly at the start of each irrigation season to flush sediment before it reaches the check valves. West Texas water carries enough mineral content that this simple step can extend seal life significantly.
Keep the area clear. Backflow assemblies need accessible airspace for ventilation, testing, and repair. Don’t bury them under mulch, let shrubs grow over them, or store equipment against them.
Schedule regular professional maintenance. Even outside of required testing intervals, having a licensed technician inspect the assembly annually catches wear patterns that visual checks miss.
Frequently Asked Questions
Is it normal for my backflow preventer to drip water?
Small amounts of water during system startup, shutdown, or pressure changes can be normal, especially from the relief valve on an RPZ or the air vent on a PVB. If the dripping stops within a few seconds of the pressure stabilizing, there’s typically no problem. Continuous dripping when the system is off always indicates a failure that needs attention.
How do I know which type of backflow preventer I have?
Look at the physical characteristics. A PVB stands vertically and is installed above ground with a bell-shaped bonnet on top. An RPZ sits horizontally with a visible relief port on the bottom. A DCVA is compact and inline, often installed below ground in a valve box. An AVB is a small device mounted directly on individual zone valves.
Can I repair my backflow preventer myself?
It depends on the type. A PVB bonnet/poppet swap after freeze damage is a common and manageable DIY project, especially with a manufacturer repair kit ($15 to $60). RPZ and DCVA repairs are more complex, require specialized tools, and must be re-certified by a licensed BPAT tester afterward. If you’re unsure about what you’re looking at inside the device, calling a professional is the safer choice.
How much does it cost to repair a leaking backflow assembly?
Residential repairs typically run $100 to $500. The cost depends on whether you need a simple rubber kit or multiple internal components. Full replacement ranges from $280 to $1,550 depending on device type. A good rule of thumb: replace if the repair cost exceeds 50% of a new installed unit.
How often does Lubbock require backflow testing?
Residential irrigation backflow assemblies connected to the city water supply must be tested every one to three years. Commercial systems require annual testing. All testing must be performed by a TCEQ-licensed BPAT registered with the City of Lubbock, and test reports must be submitted within 10 days.
What causes a backflow preventer to leak after a freeze?
Water trapped inside the assembly expands when it freezes, cracking internal components. On PVB devices, the bonnet and poppet are designed as sacrificial parts, engineered to break first so the more expensive brass body survives. If only the bonnet cracked, a repair kit fixes it. If the main body split, the entire assembly needs replacement.
Why is my RPZ backflow preventer dumping large amounts of water?
The relief valve is opening because the pressure zone between the two check valves isn’t being maintained. This usually means the first check valve has failed, often from debris wedged in the sealing surface. The dumping is the RPZ doing its job correctly, protecting your drinking water, but it signals that internal repair is needed promptly.
Need help diagnosing or repairing a backflow assembly in Lubbock or West Texas? See our full guide on how backflow repairs are diagnosed and fixed or contact M&M Sprinklers at (806) 794-1300 for professional service from a BPAT-licensed team.